In K-12 schools, makerspaces are dedicated areas where students can use hands-on techniques and tools to make something new, discover problems and solutions, and to consider how their learning of discrete skills and concepts can be applied in real life.
Some schools are developing dedicated makerspace areas in empty spaces or classrooms in the building. Others are retooling their libraries to contain a makerspace zone and still others have makerspaces within the general classroom.
Still, setting up makerspaces, using them effectively, and ensuring these areas are more than a fun activity can be a challenge. This guide helps you generate makerspace ideas that set all students up for success.
One of the first stumbling blocks schools run into with makerspaces is where to put them and why. Should they go into the art room? Or perhaps, revitalize an under-used library. Or perhaps, we should create a STEAM lab and house the makerspace inside.
It’s important to understand the difference between each of these areas, and how to find a solution that fits your vision for a future-ready school. We want to make sure we’re not using technology for the sake of technology, or creating Makerspaces and STEAM Labs because it is a current trend in education.
Here’s an overview of what makes each of these areas different:
-
- A Makerspace is a DIY space for exploration where people can gather to create, invent, and learn.
-
- A Library is a collection of informational resources for reference or borrowing. It provides physical or digital access to material, and may be a physical building or room, or a virtual space, or both. Libraries can be a hub for creativity. They are a learning environment for individuals to gather research and to explore a variety of texts. They can also serve as a place for teams of people to plan innovation through technological means. Sometimes, this is the place where schools house their computer labs, 3D printers, and other technology tools.
-
- A STEAM Lab is a place for teachers to lead pre-planned, guided content that integrates Science, Technology, Engineering, Arts and Math standards. STEAM Labs often serve as the springboard to moving from a pure makerspace to a more focused lesson using the makerspace foundation.
While similar, each of these areas serves a different purpose. Consider the intention of what you’d like to create. Certainly, a makerspace could be housed in a Library or a STEAM Lab. But it serves a distinct purpose of exploration, creation, invention, and hands-on learning.
How to Create a Makerspace
Now that you know what a school makerspace is and the purpose behind it, it’s time to consider how to actually create one.
Funding
As you begin your makerspace design, consider the type of place and partnerships (if any) you want to cultivate. If working with partners, you may want to ask local businesses, organizations and arts groups for support. This support can be in supplies, funding or even hands-on classes. Concordia University has a starter eBook with a good “reach-out” letter you can use for this. We also have a helpful guide for finding funding to support your arts integration and makerspace ideas.
In terms of what items to include, most makerspaces can be built inexpensively to start. Many people think you need expensive supplies like Little Bits or 3D Printers to start, but that’s not always the case. Take a look at this list of 114 Tips to Create a Makerspace which has a list of supplies from least expensive to most pricey. This is a good place to begin when looking at pricing out your effort.
Building it Out
Depending on your intention for the space, the options for building out your space are widely varied. Remember: the makerspace definition shares these spaces are intended to allow for creating, inventing and learning. So what items will allow you to do that with students in new and interesting ways?
Certainly, you can go with 3D printing stations and have students explore the process of taking a design and turning it into a 3D, tangible object. But you could just as easily include items like sewing machines, culinary tools and AutoDesk stations.
You can also go for a more budget-friendly approach and include things like a Tinker Station that has random parts from old machines – think bolts, washers, random chips from old computers – as well as some adhesives and connectors for students to build and create models for specific lessons or designs. Need more? Try this comprehensive guide from School Specialty.
Create the Intention for Your Makerspace Design
The idea here is that you’re building a makerspace to serve your intention. Are you looking for this to be a place for more organic discovery? Or do you only want students to use the makerspace for specific projects or ideas? That will determine what items you need and how you design the layout.
And don’t feel like you need to be confined to an indoor space! You can take your makerspaces outside, too. That’s exactly what Jeff Mather does as the STEAM artist-in-residence with Drew Charter School’s TinkerYard. This project provided students with a place to plan their new playground and then build it outside. The making takes place in multiple areas and isn’t confined to a single classroom.
Design and Delivery
Connecting your makerspace to the curriculum is the single best way to ensure these spaces are most effective for student learning. Making just to make is absolutely necessary for students to explore their own creative practice. But at some point, that needs to move into a direct connection and application with what they’re learning in the classroom.
This is where makerspaces can really go to the next level. If you design a makerspace for kids that is flexible enough to create in a variety of methods, while also providing the framework of a learning experience, students will make stronger connections to the discreet content they are studying. These connections are what enable them to experiment, reflect and revise.
By creating an intentional lesson design that includes time for making, the makerspace becomes an extension of the learning process, rather than an event in and of itself.
To do this, try working backwards.
- Want students to create an art bot? You’ve got to discuss circuitry and artistic design first.
- Want to design that new playground? Students need to learn about measurement, the design process and environmental changes that could effect the equipment.
Start with the end in mind and determine where that fits into the components of your curriculum as it stands now. Then, weave a makerspace in as part of your new lesson process.
114 Makerspace Supplies for Schools
Do you ever wonder what you should include in a school makerspace? Maybe you’ve received some grant funding, or maybe you have a great PTA who is willing to help you create a starter STEAM lab.
Or, you might just have some extra supplies and want to know what you need to get a STEAM-focused makerspace project up and running.
You’re not alone! This resource contains 114 tips, ideas, resources and even lesson ideas for creating your very own STEAM Makerspace in Schools. No more overwhelm, no more panic. This comprehensive guide will help you make the most out of your space, time and dollars.
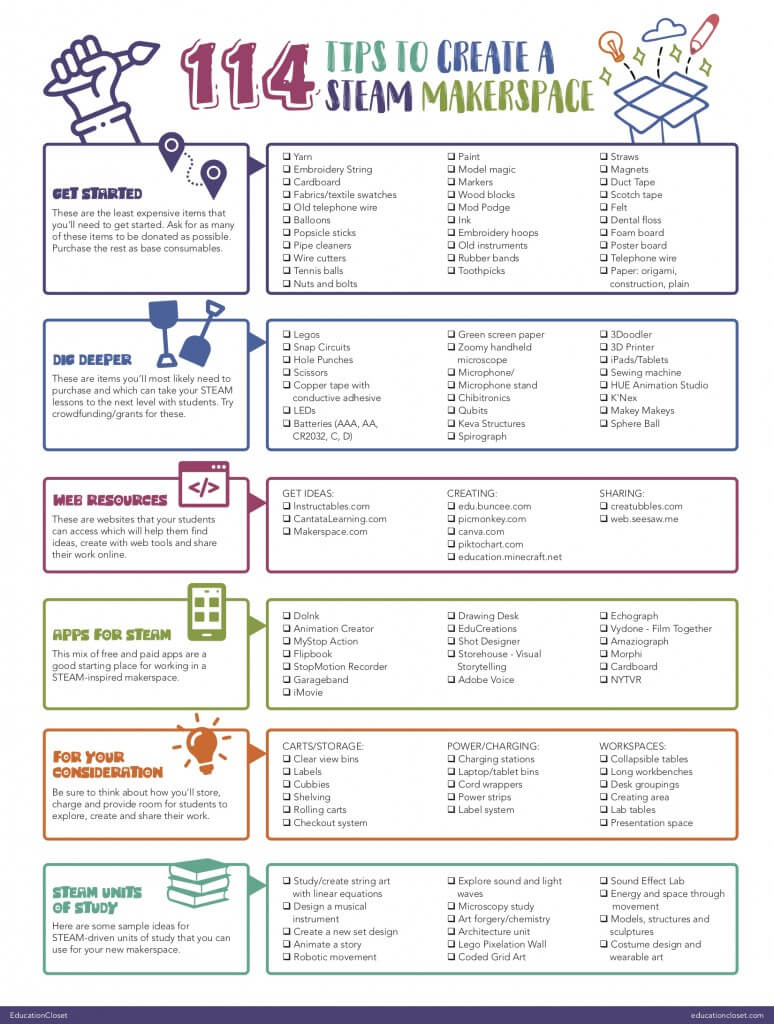
DOWNLOAD THIS MAKERSPACE SUPPLIES PDF
Certainly, you could extend this list even further with more tools, technology, and resources. But this list is a good starting point, and might even contain some new items for your makerspace-veterans out there.
Getting Started
These are the least expensive items you’ll need, and the ones that will get students creating the fastest.
- Yarn
- Embroidery String
- Cardboard
- Fabrics/Textile Swatches
- Old Telephone wire
- Balloons
- Popsicle sticks
- Pipe Cleaners
- Wire cutters
- Tennis balls
- Nuts and Bolts
- Paint
- Model Magic
- Markers
- Wood Blocks
- Mod Podge
- Ink
- Embroidery Hoops
- Old Instruments
- Rubber Bands
- Toothpicks
- Straws
- Magnets
- Duct Tape
- Scotch Tape
- Felt
- Dental Floss
- Foam Board
- Poster Board
- Paper: origami, construction, and plain
Digging Deeper
These are items you’ll need to purchase. Some are relatively inexpensive, while others will require a budget. Think of these as “nice to have” items. If on a limited budget, start with just one or two of the bigger items and add in more over time.
- Legos
- Snap Circuits
- Hole punches
- Scissors
- Copper tape with conductive adhesive
- LEDs
- Batteries (AAA, AA, CR2032, C, D)
- Green screen paper
- Zoomy handheld microscope
- Microphone
- Microphone stand
- Chibitronics
- Quibits
- Keva Structures
- Spirograph
- 3Doodler
- 3D Printer
- iPads/Tablets
- Sewing Machines
- HUE Animation Studio
- K’Nex
- Makey Makeys
- Sphero Ball
Makerspace Web Resources
These are websites students can use to help them find ideas, create and share their work.
- Instructables.com
- CantataLearning.com
- Makerspace.com
- edu.buncee.com
- picmonkey.com
- canva.com
- piktochart.com
- education.minecraft.net
- creatubbles.com
- web.seesaw.me
Apps for STEAM Makerspace Libraries
This mix of free and paid apps are some of our favorites for working in and through STEAM.
- DoInk
- Animation Creator
- MyStop Action
- Flipbook
- StopMotion Recorder
- Garageband
- iMovie
- Drawing Desk
- EduCreations
- Shot Designer
- Store-house Visual Storytelling
- Adobe Voice
- Echograph
- Vyclone Film Together
- Amaziograph
- Morphi
- Cardboard
- NYTVR
Be Sure to Consider
There are a number of things that we sometimes forget when creating a maker space. Be sure you have thought about the following:
- Carts and Storage: including bins, labels, cubbies, shelving, rolling carts and a checkout system.
- Power/Charging: including charging stations, laptop/tablet bins, cord wrappers, power strips and a labeling system.
- Workspaces: including collapsible tables, long workbenches, desk groupings, a creating area, lab tables and a presentation space.
STEAM Units of Study
Need a few project ideas for using your new makerspace? Here are some of our top units of study:
- String art with linear equations
- Designing musical instruments
- Creating a new set design
- Animating a story
- Exploring robotic movement
- Exploring sound and light waves
- Microscopy study
- Art forgery and chemistry
- Architecture unit
- Lego Pixelation Wall
- Coded Grid Art
- Sound Effect Lab
- Energy and Space exploration through Movement
- Models, structures, and sculptures
- Costume design and wearable art

Organizing Makerspaces
When it comes to offering opportunities for students to create, space can quickly become an issue. Organizing makerspace supplies in schools is critical if you’re going to have any chance of keeping to room from become a big black hole. But that kind of organization doesn’t always come cheap. In fact, if you look at most suppliers’ websites, makerspace products and storage solutions can cost hundreds – or even thousands – of dollars. What’s a teacher to do?
Thankfully, we teachers are MacGyvers when it comes to making things work. We can always find a work-around for our students. With that in mind, here are 3 budget-friendly makerspace organization hacks. So you can go from maker-crazed to maker-confident in no time flat.
#1: DIY Maker Cart
First up – you’ve got to give your materials a space to live. And while shelving is nice, it’s not always available or practical. Having a cart that you can pull out when it’s time for a maker project is handy and helpful. You can also wheel it around to student tables or desks and share it between classrooms. And if you have in-progress projects, these carts can be a place for students to quickly store their work.
These carts can often be pricey – between $300-500 each. Instead, try creating a PVC maker cart. You can use these directions from the Free PVC Projects and Plans site for any kind of cart you can dream up.
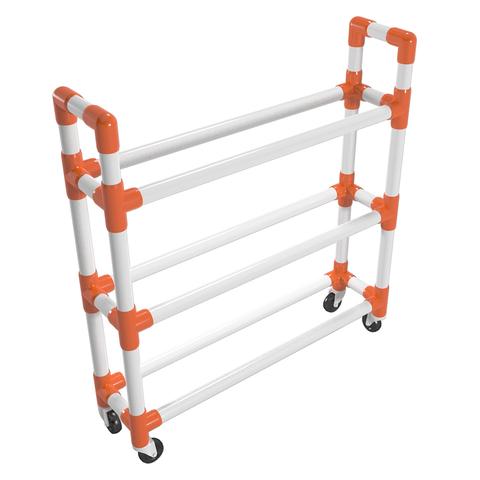
Photo credit: Formufit – https://formufit.com/pages/pvc-athletic-ball-storage-cart
There’s some of large containers, as well as ones with space for smaller trays and bins. While you’re over there, be sure to check out the project for creating an outdoor sink. Those of you stuck in the portables will find that super helpful.
#2: Creative Containers
All those color-coded containers we see on Pinterest look beautiful, but once you start purchasing those tubs, it can really add up. While you definitely want a few sturdy plastic containers (with lids), you can supplement these with recycled containers as well. Try using things like:
- Cardboard boxes – wrap them in colored paper or paint them for color-coding purposes
- Egg cartons – keep the lids on and use these for smaller items like paperclips, bolts, beads, etc.
- Old spice jars – also good for small items. Add some magnetic tape to the sides and add them to your chalkboard/whiteboard so students can easily grab what they need.
- Recycling containers – sometimes, these get updated for communities. When that happens, ask folks to donate their old ones to you. These are great for large-scale items.
With any of these, do be sure to label each container with the item category (like tubes, wheels, attachments, etc) and color-code with post-it notes. This helps for easy visual organization as well.
#3: Rethink Tech Support
Often, we think we need these huge carts to store iPads, robots, and other plug-in items. Not true! Check out this innovative use of a simple plastic bin, a power strip and some dowel rods:
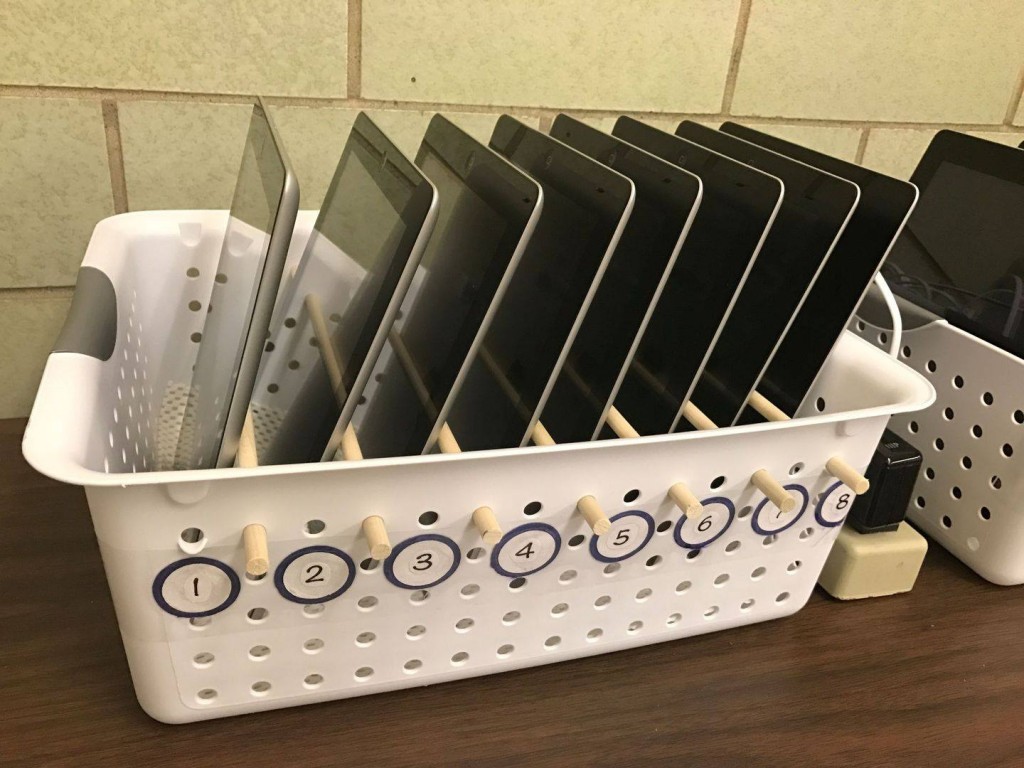
Photo Credit: A Love of Teaching: https://aloveofteaching.com/
Colleen Graves shares this “Charging Box” for Spheros out of an old plastic tub and some zip ties. Think of all the other ways you could get creative with what you already have!
Makerspaces are meant to be messy, hands-on learning opportunities for students to create and explore. But that doesn’t mean they need to overrun your classroom learning space. You can have organization and chaos at the same time.
Classroom Management for Makers
Once you get a school makerspace set up, and you’ve organized it as best as possible, now it’s time to bring in the students. But what happens when students are provided with a smorgasbord of tools, supplies, and choices?
Lots and lots of noise. And possible chaos.
To avoid this and ensure your students are on-task while still enjoying the creative process, you’ll likely need to revisit your classroom management strategies. Here’s a video with some quick ideas for managing a makerspace:
Makerspace in the Classroom: Lesson and Resources
Ready to take your makerspace to the next level? Then you’ll need some lessons, resources or curricula to make this process effective. Here are some sources to get you started:
Hopefully, this guide has given you everything you need for a makerspace in your classroom, school or community. If you’d like a more hands-on learning experience, try out our Designed to STEAM online course. It’s one of the best ways you can create STEAM lessons that tie into your new maker-centered classroom.