STEAMing through the Water Cycle
4 Min Read • STEAM
I’ve been teaching the water cycle lesson for a number of years. Each year, I try to reflect on my unit to see if there’s anything that I could add or adjust, such as movement in the classroom, to help the students master and retain the science concepts and vocabulary more successfully.
This year I was inspired to turn up the level of STEAM by connecting music and dance in the classroom. I introduced the water cycle lesson in a musical way after reading Jenny Dees’ wonderful article “The Sounds of Science Cloudy with a Chance of Beethoven” in the July edition of STEAMed Magazine. You can find it on page 10 here: http://www.joomag.com/magazine/steamed-magazine-july-2015/0492841001435348903?short.
I moved forward with my planned hands-on science lessons to help students see the water cycle lesson in action. My students knew the concept of the water cycle lesson, but even after hearing and seeing the vocabulary words, they were having trouble retaining them. In the past, we’ve played around with acting out the water cycle lesson, but when I stumbled upon the following lesson, I knew I could modify it to make what I had previously done more effective. This is adapted from a lesson on Teachers Pay Teachers by “One Room Schoolhouse”.
Water Cycle Lesson Dance
Printer-friendly version: WaterCycleDanceLesson
- Introduction/Review
- Review the steps of the water cycle lesson and the meaning of each vocabulary word.
- Before joining together in a circle, teach students a stop signal. (When the teacher claps [or rings a bell, etc], then everyone freezes.) Have the students practice a couple of times before you begin.
- Space is an element of dance that we are going to focus on. Personal space is the space around your body. General space is the space of the entire area. In some steps of the dance, we are really going to have to watch our body make sure we stay in our personal space. Demonstrate both personal space and general space. Also, in dance we work on a high level, middle level, and a low level. Ask students what they think the different levels look like and help students demonstrate each level.
- Begin with the students sitting in a large circle, with the teacher positioned in the center of the circle. Explain that the first stage of the water cycle we will demonstrate is evaporation. Explain that evaporation happens when the sun heats the water in oceans, rivers, lakes, and streams and turns the water into water vapor. The water vapor then rises into the air. After the explanation, demonstrate the movements the children are to do to depict evaporation.
- Begin to show evaporation by fanning yourself because it is so hot. Have the students follow your lead. Then, from a sitting position, rise and jump up and down, reaching toward the sky. Continue to do this for about 30 seconds, give students stop signal, and then stand quietly and listen. Ask students, “What level were we on at the beginning of this stage? End of the stage?”
- Describe condensation. Tell the students that the water vapor becomes cold and changes into liquid. This liquid forms clouds.
- Stand and shiver, rubbing your arms and moving your body slightly. The class will then join together by forming a group and holding hands, jumping up and down. They will “condense” in this way for about 30 seconds, give stop signal, and then stand and listen. Ask students “What level were we on at the beginning of this stage? End of this stage?”
- Tell the students about precipitation. The next stage of the water cycle lesson by describing how the condensed water becomes so heavy that it must fall down to the Earth as rain, hail, sleet, or snow.
- The class will unclasp hands and fall slowly to the ground. The teacher can have the students fall as rain (fast and furious), hail or sleet (slower and slightly bouncing off the ground when it reaches it), or snow (arms and legs out wide so that when they “hit” the ground they look like snowflakes). Finally, discuss collection with the students. He or she will explain that the water will again eventually run into oceans, lakes, rivers, etc. Everyone will crawl on the floor back to their original circle and sit quietly. Ask students “What level were we on at the beginning of this stage? End of this stage?”
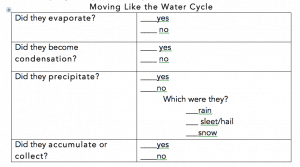
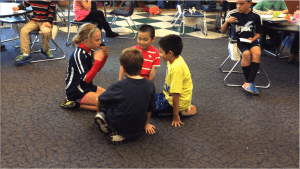
- Place students into small groups. With their group, have them practice acting out the water cycle lesson using the movement (or new movement). Once groups are finished practicing, each group should perform for the class. To keep the audience engaged as each group performs their dance in the classroom, have students evaluate groups using the following checklist:


5. Culminate by sharing the book Water Dance by Thomas Locker. As you read each page, have a student share the stage of the water cycle lesson it depicts.
You can find the original version of this plan here. Shared with permission. https://www.teacherspayteachers.com/Product/Water-Cycle-Dance-238876


